
Recommended
Tools And Supplies:
wool felt
4mm doll eyes
needle and thread
toy filling
wire
small sharp scissors
stuffing tool (chop stick and/or tooth pick)

MAKE YOUR OWN FELT FROGS!

Begin by cutting each pattern piece from the felt provided with your kit. For the best results in cutting felt it is recommended to tape the pattern to the pieces of felt using wide clear tape. For more detailed instructions check out our felt cutting tutorial.
Next we’ll be installing eyes on the main body pieces of the frog. Your kit includes a set of plastic safety eyes! Create a small hole where you want to install the eye. insert the end of the eye post into the small hole and fit the included plastic washer over the back of the post.
Alternatively you could choose to use beads or tiny buttons, embroider the eyes or even paint them on.
Match the front and back ends of the Top of Head pieces and Bottom Body pieces. Stitch the front and
back edges together as shown in figure #1. turn the pieces inside out, so that the raw stitched edges will
face the inside of the frog.

Knot your thread and send the needle from the inside of the frog body to the outside, about 3/4 of the way
toward the back of the frog (figure #2). Match together the Bottom of Body piece with one side of the Main
Body, pinning at the legs and back. Begin stitching together at the edges starting from from where you knotted your thread moving downward towards the legs.


Continue stitching all along the underside of the frog, past each leg and moving towards the front of the body and past face, until you reach where you started. Send the needle to the inside of the frog and knot in place.


Once again, knot your thread at the inside of the frog about 3/4 toward the back of the frog and send the
thread to the outside of the body. Match the opposite side of the body and pin in place. Begin stitching the
edges together in the same manner as before, moving downward toward the back and across each leg.

Continue sewing until just past the eyes at the top of the head. Leave your thread in place to dangle while we work on the next part.

Next we will optionally insert wire into the legs. This creates extra stability and mild pose-ability within your felt soft sculpture pieces. My go to for adding wire to my felt creatures is to use pipe cleaners. First cut a piece of chenille wire (pipe cleaner) to a size just an bit longer than the length across both legs. I usually hold the wire up to the piece I am working on to judge the length.

Fold the wire inward at each end to make the wire just the right size to insert into the inside of the frog, and into the legs. Fold the wire upward at each side exactly where the legs would bend.

Fold wire to fit into both the front and the back sets of legs. Insert the wire into the inside of the frog’s body,
pushing down into the legs.
Now to stuff the frog! Start by balling up very small bits of toy stuffing (a little smaller than pea sized) and pushing it down into the legs. I like to use a toothpick or lollipop stick to push the stuffing into smaller spaces such as legs. Fill the legs entirely before moving on to stuffing the body.

Another optional step is to add a small mouth! I like to make semi grumpy, pouty mouths to these frogs as they are modeled after the Desert Rain frog which are particularly grumpy looking little frogs.
To add a mouth, thread your needle with embroidery thread and knot the end. Send your needle out at the front of the frogs face where you’d like to position a mouth. Send the needle back in about an 1/8 – 1/4 inch away. Trim the end of the thread but keep it tucked inside of the body. Sew the last opening shut.


FLOWER BUD HAT INSTRUCTIONS
The flower bud hats are constructed similar to the mushrooms at the beginning stages of sewing the hats. Knot your thread at the top of a gusset on the flower bud piece. Sew the edges together, but stop sewing about half of the way down the flower. Knot your thread and snip the ends.
Sew all 4 edges in this same manner, then fold the flower bud right side out. Fold each petal up slightly and place a single stitch to hold the end of each petal into place. (see pics below)


Now to create the stem and leaf for the flower bud. Begin by folding inward the short side of the flower stem, and stitching in place.


Wrap the opposite side around the stitched stem, then stitch this into place as well. Send
the needle through the stem so that the thread is extending out under the stem but above the leaf.

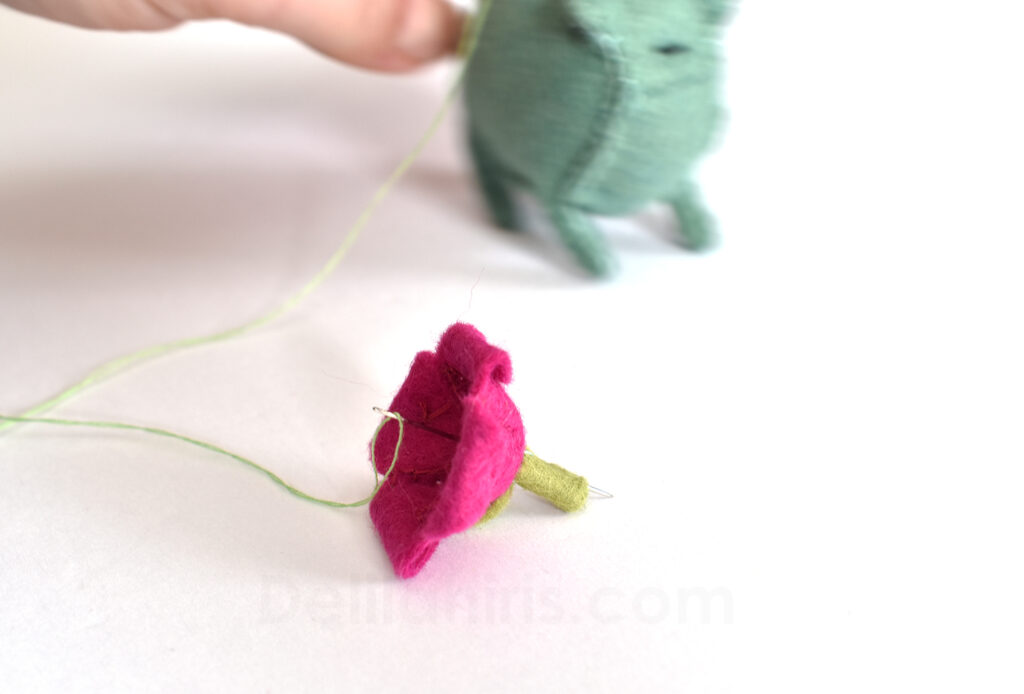
Send the needle through the top of the flower bud and out through the bottom. Send the needle back and
forth through the flower and stem a couple more times to be sure they are held firmly together.

Now to sew the hat to the top of the frog! All felt hat accessories are sewn on in the same way. My pictures will illustrate sewing a flower bud hat in place, however the steps are the same whichever hat you choose to sew.
Begin by knotting the thread of a threaded needle at the top of the frog. Send the needle straight through the bottom middle of whichever felt frog hat your choose.


Send the threaded needle through the bottom and out the top, pulling the felt hat close to the frog’s body.
Send the needle back down again, through the hat. This time send the needle into the frog’s body to firmly
sew the hat into place. You can repeat these steps a few times to sew the hat thoroughly into place. Knot
the thread under the hat and trim the excess thread.

SEWING THE MUSHROOM HAT
Start by sewing the edges of the top of the mushroom together shown in the pictures below, then knotting your thread, trimming the end and starting again at the next gusset. Sew all 4 gussets together, then folding the mushroom cap inside out.


Next sew into place several small white dots, randomly scattering them across the mushroom. Each dot can be held into place with one stitch placed in the middle of each dot.

Match the mushroom cap to the mushroom base, leaving about an 1/8 inch rim of white felt around the
mushroom base as shown below.


To sew the mushroom to the frog, Begin by knotting the thread of a threaded needle at the top of the frog. Send the needle straight through the bottom middle of the mushroom hat and straight out the top. about a 1/16 of in inch away, send the needle straight back down through the mushroom, gently tugging the thread to not collapse the mushroom inward. make a stitch or two more into the frog’s back beneath the mushroom to hold it into place.
Done! Admire your work and on to the next project! Head over to Delilahiris.com to checkout some more craft kits!